Showing posts with label Blog – Hackaday. Show all posts

Sunday, 14 April 2019

Mods Keep The WaveBird Kicking In The Switch Era

Nintendo made some questionable decisions during the early 2000’s, but developing the WaveBird certainly wasn’t one of them. Years before wireless controllers were the standard on home game consoles, the WaveBird gave GameCube owners a glimpse into the future. It managed to deliver lag-free gaming without resorting to easily-blocked infrared, and had a battery life and range long enough that there was really no downside to cutting the cord aside from the lack of rumble support.

In fact, the WaveBird was such a good controller that some fans just can’t put the thing down even in 2019. [Bill Paxton] loves his so much that he decided to modify it so he could use it on Nintendo’s latest money printing machine, the Switch, without having to fiddle with any adapters. While he was at it, he decided to fix the only serious drawback of the controller and hack in some rumble motors; arguably making his re-imagined WaveBird superior in just about every way to the original.

It might be counter-intuitive, but the trick here is that [Bill] actually took the internals from a standard wired GameCube controller and fitted it all into the case for the WaveBird. That’s how he got the rumble support back, but where does the signature wireless capability come from?

For that, he took apart a “GBros. Wireless Adapter” from 8BitDo. This gadget is intended to let you use your existing GameCube controllers on the Switch wirelessly, so all he had to do was shove its PCB inside the controller and wire it directly to the pads on the controller’s board. Thankfully, the WaveBird was rather husky to begin with, so there’s enough space inside to add all the extra hardware without much fuss.

Between modifications like this and efforts to reverse engineer the controller’s wireless protocol, hackers aren’t about to let this revolutionary accessory go gently into that good night. You might see a GameCube slaughtered for a meme, but WaveBirds never die.

[Thanks to Bill for the tip]

This Bot Might Be The Way To Save Recycling

Recycling is on paper at least, a wonderful thing. Taking waste and converting it into new usable material is generally more efficient than digging up more raw materials. Unfortunately though, sorting this waste material is a labor-intensive process. With China implementing bans on waste imports, suddenly the world is finding it difficult to find anywhere to accept its waste for reprocessing. In an attempt to help solve this problem, MIT’s CSAIL group have developed a recycling robot.

The robot aims to reduce the reliance on human sorters and thus improve the viability of recycling operations. This is achieved through a novel approach of using special actuators that sort by material stiffness and conductivity. The actuators are known as handed shearing auxetics – a type of actuator that expands in width when stretched. By having two of these oppose each other, they can grip a variety of objects without having to worry about orientation or grip strength like conventional rigid grippers. With pressure sensors to determine how much a material squishes, and a capacitive sensor to determine conductivity, it’s possible to sort materials into paper, plastic, and metal bins.

The research paper outlines the development of the gripper in detail. Care was taken to build something that is robust enough to deal with the recycling environment, as well as capable of handling the sorting tasks. There’s a long way to go to take this proof of concept to the commercially viable stage, but it’s a promising start to a difficult resource problem.

MIT’s CSAIL is a hotbed of interesting projects, developing everything from visual microphones to camoflauge for image recognition systems. Video after the break.


Simon Game Is A Story Of Rushed Deadlines And Holiday Cheer

Sometimes the Christmas season can feel like a holiday all about spending money to demonstrate your love for others. Many a maker has attempted to subvert these commercialistic overtones by giving handmade presents to friends and loved ones. [APA] is no exception, and has shared their story of producing a simple Simon game during the holidays.

The circuit is nothing wild – an ATtiny85 microcontroller interfaces a handful of buttons and LEDs to handle the basic Simon gameplay. The real value is in [APA]’s retelling of the development process. It’s an accurate recounting that makes us relive some of our own follies of early projects. There’s the confusion between SMD and through hole versions of the same part, forgotten pull up resistors, as well as hours lost trying to figure out why a chip won’t write, only to learn the bootloader hasn’t been burned yet.

In the end, [APA] was able to push through a rush order and deliver the gifts on time, despite the many pitfalls along the way. The final game provided some laughs around the dinner table at Christmas, so we’d say the mission was definitely accomplished.

We’ve seen similar work before, too – like this tiny Simon game on an ATtiny13.

These Wire Strippers Are Made From PCBs

The rise in cheap PCB fabrication has made old-school prototyping methods such as wire wrapping somewhat passé, but it still has its place. And if you’re going to wire wrap, you’re going to want a quick and easy way to strip that fine Kynar-insulated wire. So why not use PCB material to make this handy wire-wrapping wire stripper?

The tool that [danielrp] built is pretty simple – just a pair of razor blades held together so as to form a narrow slot to cut insulation while leaving the conductor untouched. The body of the tool is formed of two PCBs, between which the blades are sandwiched. [danielrp] designed the outline of the PCBs in DraftSight, then exported a DXF into EAGLE to make the Gerbers. The fabricated boards needed a little post-processing, including tapping the holes on one side to accept the screws that hold the tool together. We were surprised that FR4 took the threads at all, but it seems to work for this low-torque application. The disposable snap-type blades were sandwiched between the PCBs and the gap between them adjusted for nick-free stripping. The video below shows the design and build process.

We always appreciate homemade tools, and the fact that you can get a stack of PCBs for almost nothing makes us wonder what else we could use them for. We recently saw them used in a unique word clock, and even turned into a folding circuit sculpture.

Remanufacturing A Rotary Airplane Engine

If someone tells you they have seen a rotary engine, the chances are that you will immediately think of a Wankel engine, as you might find in some of the more exotic Mazda sports cars. But there is another rotary engine that has a prior claim to the name, and it can be found as the power unit for many early-twentieth-century aircraft. In these rotary engines the cylinders are arranged radially around a stationary crankshaft, and it is the engine itself that rotates. They have the advantage of extreme simplicity, smooth power, and a low parts count, at the expense of total loss lubrication, a relatively large rotating mass, and some difficulty in controlling their power. These rotary engines were largely obsolete by the 1920s, but  recent upsurge of interest in WW1-era aircraft has led to the creation of a small demand for them. New Zealand based Classic Aero Machining Service have stepped in to fill that gap and are remanufacturing the Gnome radial engine, the most numerous design of that era.

For anyone with an interest in internal combustion engines, the Gnome is a fascinating study. It’s a nine-cylinder design that runs a four-stroke Otto cycle, but instead of the two or more valves you might be familiar with from your motor vehicle it has only a single valve. The so-called Monosoupape design uses its valve for both fuel and exhaust, opening it on the inlet stroke as well as the exhaust stroke. The simplicity of a single valve and no carburetor is thus offset by a difficulty in varying its power , so rotary engines would frequently reduce the number of firing cylinders in lieu of throttling back.

The CAMS Gnome is a faithful copy of the original, but with modern metallurgy and the addition of an electronic ignition system. The original castor oil is still used — it seems classic aviation buffs like the smell — but becuase it is notorious for leaving sticky deposits in the engine they are evaluating modern alternatives. They have some technical details on their website, and there’s a good chance you my hear one of their engines one day at an air show near you.

Thanks [Itay] for the tip.

It’s (Almost) Two Keytars In One!

All the best retro-1980s chiptune acts should possess a keytar. It’s the Law, or something. [Theremin Hero] has reminded us of this with a new video we’ve shown below featuring an instrument he had a part in creating alongside [Sam Wray] and [Siddharth Vadgama] a few years ago. The Blade is a 3D-printed keytar featuring two Guitar Hero necks and an integrated pair of Game Boys to provide the sound from the authentic silicon.

To describe it in those terms though is to miss a wealth of other components and featured. The keyboard itself is from a Rock Band keytar which feeds MIDI to a Raspberry Pi running PD Extended that handles all the button press mappings. An Arduino Mega performs the same task for the two Guitar Hero necks. Midi from the various sources is processed by an Arduino Boy which then feeds the Game Boys that make the sounds. Oh – and there’s a Leap Motion 3D motion controller in the mix as well, though that doesn’t seem to be used directly in the chiptune synth functionality.

We’ve had a few keytars here over the years, but this one makes us think of the Commodore 64 instrument created by [Jeri Ellsworth].

Rad-Hard ARM Microcontrollers, Because Ceramic Components Are Just Cooler

If you’re building a cubesat, great, just grab a microcontroller off the shelf, you probably don’t need to worry about radiation hardening. If you’re building an experiment for the ISS, just use any old microcontroller. Deep space? That’s a little harder, and you might need to look into radiation tolerant and radiation hardened microcontrollers. Microchip has just announced the release of two micros that meet this spec, in both radiation-tolerant and radiation-hardened varieties.

The new devices are the SAMV71Q21RT (radiation-tolerant) and the SAMRH71 (rad-hard), both ARM Cortex-M7 chips running at around 300 MHz with enough RAM to do pretty much anything you would want to do with a microcontroller. Peripherals include CAN-FD and Ethernet-AVB, analog front-end controllers, and the usual support for I2C, SPI, and other standards. This chip does it in space, and comes in a ceramic quad flat package with gold lead frames. These are beautiful devices.

Microchip has an incredible number of space-rated, rad-hard hardware; this is mostly due to their acquisition of Atmel a few years ago, and yes, it absolutely is possible to build a rad-hard Arduino Mega using the chip, space rated.

Of course, there are very, very, very few people who would actually ever need a rad-hard microcontroller; I would honestly expect this to be relevant to only one or two people reading this, and they too probably got the press release. If you’ve ever wanted to build something that goes to space, and you’d like to over-engineer everything about it, you now have the option for an ARM Cortex-M7.

Friday, 12 April 2019

A Simple Programmable Light Controller

Everything’s internet connected these days, garage doors, baby monitors, and the kitchen sink are all hooked up. There are benefits to having everything online, but also several pitfalls. Maintaining security on a home network is an ongoing job, made more difficult by the number of devices that must be kept track of. Sometimes all the hassle isn’t worth it, and you just want a non-connected solution. [Dilshan] found himself in just that camp, and built a simple programmable light controller that doesn’t connect to the Internet. 

At the core of the project is an ATMEGA8 microcontroller, which is cheap, readily available, and can do the job. It’s combined with a DS1307 real time clock IC to keep track of time. The circuit is designed for 24V power, to allow it to be run from the same supply as the LED light modules it is designed to control.

The design was initially prototyped with through-hole parts on the breadboard, with the final design being built with surface mount parts on a custom PCB. Light is courtesy of a 7W warm white LED module. 3 push buttons and a 4-digit, 7-segment display act as the user interface, with an LDR to allow the light to also react to its surroundings.

It’s a build that goes against current trends, lacking WiFi connectivity, Twitter functionality, or cloud-based logging. It goes to show that the right solution isn’t always putting everything online. Sometimes the old methods are enough to do the job, and do it well.

Of course, if you’re still itching for a packet data fix, here’s how to blink an LED over the Internet.

Luxmeter Meets Linux

Over the past 30 years the price of hardware has slowly but surely come down, and it’s now possible to buy all manner of widgets and gizmos online for less than the price of a fancy Italian dinner. By and large this is a good thing, but it’s not uncommon to find that your new tools are let down by the software side of things. Of course, you can always develop your own solution – and in [ThePhil]’s case, that’s exactly what he did.

The hardware in question was a PCE-174 luxmeter, which came with an uncooperative Windows application as standard. This simply wouldn’t do, so [ThePhil] set about developing a Linux version in Python. This was achieved through the aid of documentation, not of the PCE-174, but its sibling from another corporation – the Extech HD450. The two meters were similar enough that the Extech’s better documentation was able to fill in the gaps of [ThePhil]’s understanding.

[ThePhil] has diligently implemented the full feature set of the PCE-174, and has documented the project well. There are even notes on the version numbers of various dependencies, which will surely be a great help if someone’s trying to run the code five years down the track.

It’s a great lesson that one need not be at the mercy of the software one is given. For a great many cases, it’s possible to roll your own solutions that are robust and get the job done. This approach can be taken to great lengths – you can go so far as replacing an entire camera firmware, if you so wish.


Israel’s Moon Lander Crashed, and That’s OK

ESP32 Alarm Clock Doesn’t Skimp On The Features

The ESP family of microcontrollers is absolutely on fire right now, with a decent chunk of the projects that come our way now based on one of the impossibly cheap WiFi-enabled boards. In fact, they are so cheap and popular that we’ve started to see a somewhat unexpected trend; people have a tendency to use them as drop-in replacements, despite the more modern boards being considerably more powerful than required. The end result is a bunch of projects in which the ESP is simply underutilized. It’s not a big deal, but somewhat disappointing to see.

But we can assure you this ESP32 alarm clock created by [Pangodream] is absolutely not one of them. He’s packed an impressive number of features into this unassuming little timepiece, and it’s really an excellent example of how much these boards are capable of without breaking a sweat. From DIY touch sensors to the Android application used to configure the clock over the network, this project is overflowing with neat hardware and software tricks worth taking a closer look at.

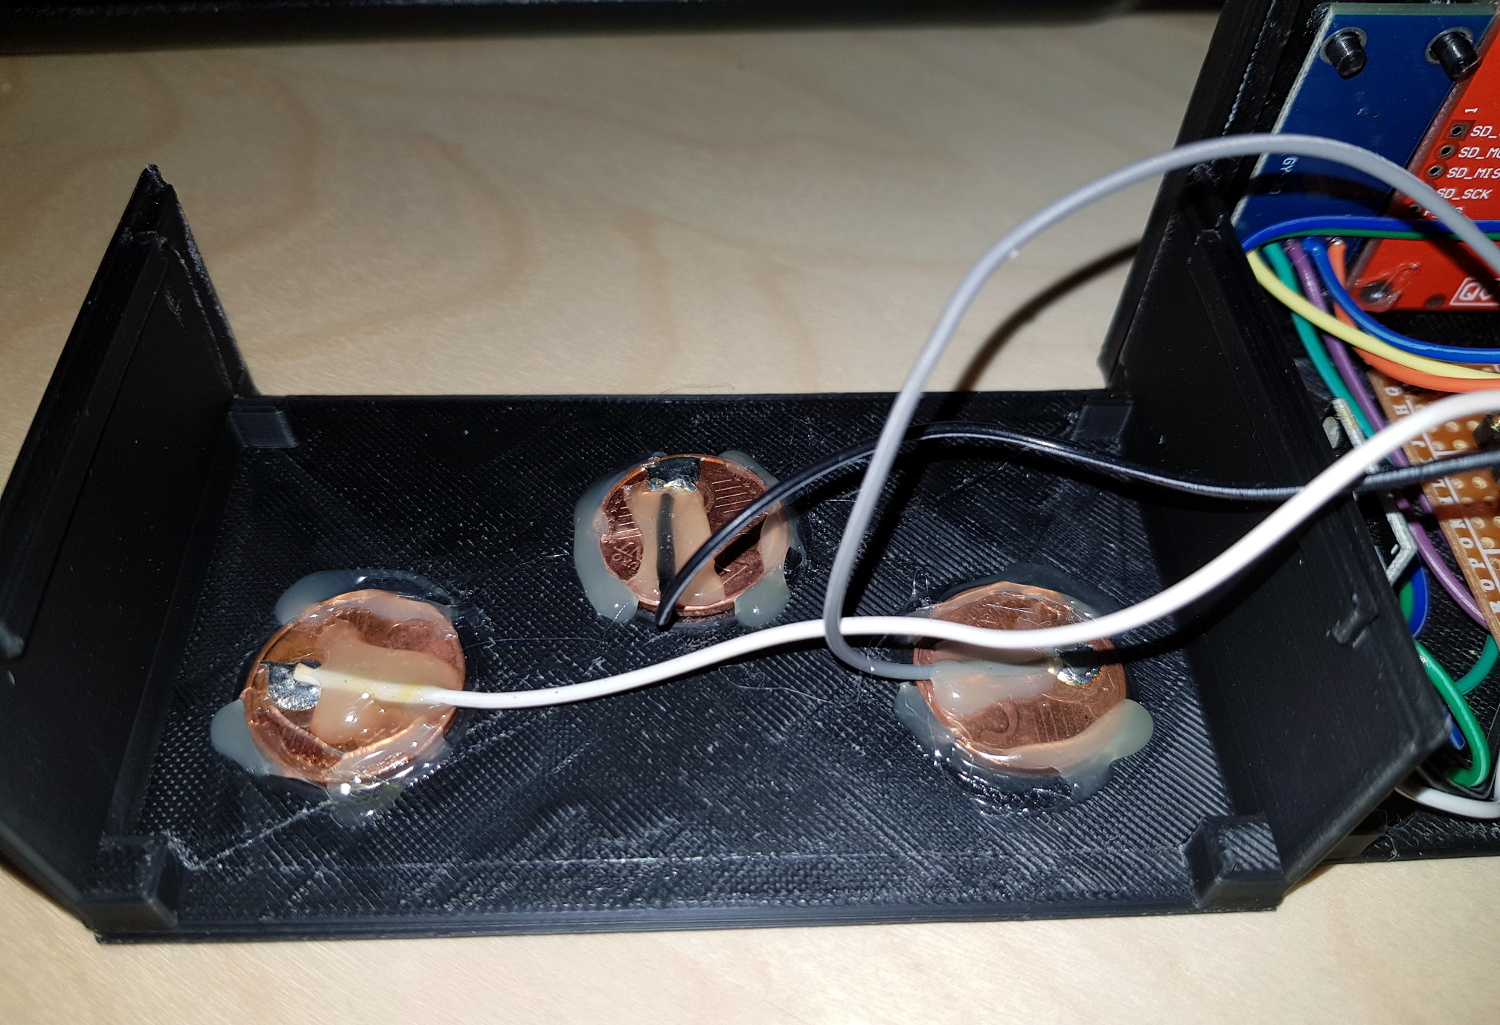
Inside the 3D printed case, the clock features a BH150 light sensor, the very popular DHT-11 for detecting temperature and humidity, as well as a ILI9341 2.8 inch LCD for the display. In a particularly clever touch (get it?), [Pangodream] used three coins connected to the digital pins of the ESP32 as capacitive sensors. These allow him to interact with the click just by tapping the top of the case, and saved him the trouble of adding traditional switches or buttons. We might have put some indentations in the top case to make identifying which of the three “buttons” you’re pushing, but we suppose the invisible interface does make things look a little more futuristic.

But if even that is too much physical touching for you, then [Pangodream] has come up with a fairly robust system for controlling and interacting with the clock over the network. It’s not just a convenient way of setting the time, a good number of the clock’s functions can be polled and configured in this manner; everything from the sensitivity of the touch sensors to how many times it will beep when the alarm goes off. To make things easier, he’s even wrapped it all up in a handy Android application for on the go configuration.

If this clock doesn’t offer you the level of over-engineering you require, check out this build that uses no less than five ESP32s to get the job done. Or maybe this one that hooks into NASA’s Deep Space Network.

This Bike Pump Now Sucks

Pulling a vacuum is something every proud maker must do once in a while. Whether you’re degassing epoxy or vacuum forming parts, you’ll need a reliable pump to get the job done. [drcrash] has just the guide to help – on how to convert a regular handpump to vacuum duty. (Video embedded after the break.)

[drcrash] recommends starting with a Slime brand 2060-A pump or similar. It’s a basic hand pump, with no pressure gauges or other frills to get in the way. It’s also got a strong steel shaft that can hold up to repeated use. You’ll also need some tubing and a check valve to get the job done.

The basic concept is to reconfigure the pump to suck air out of things rather than blowing it into them. By removing the original check valve and installing one in the opposite direction, and reversing the pump’s piston, it’s possible to pull good vacuum without breaking a sweat. [drcrash] reports that it’s possible to go up to 11 psi below atmospheric with this setup, which is plenty for a wide range of applications. If you need to go further, you can try building your own turbomolecular pump instead.


The $50 Ham: Checking Out the Local Repeater Scene

Implementing Qi Inductive Charging Yourself

Inductive charging is a technology that has promised a lot, but hasn’t quite delivered on the promise of never needing to plug in your phone again. The technology behind it is surprisingly simple though, and [Vinod.S] takes us through it all with an ATtiny13-based example.

An inductive charger has to be clever in its operation, for if it were to operate continuously it would soon have more in common with an inductive hob and thus become a fire risk, so it has to be sure that a compatible device is resting upon it before it tries to transmit power. It achieves this by periodically sending out a pulse of power intended to wake any devices in contact with it, and the device responds with a serial data stream encoded onto the device’s field by modifying the resonance of the receiver tuned circuit. This is done by a pair of MOSFETs under the control of the ATtiny in [Vinod]’s device, resulting in a functioning inductive power receiver built on a piece of prototyping board and sporting a buck converter capable of supplying 5 volts suitable to charge a phone. You can find the code on GitHub and see it in action below the break.

This tech has made an appearance here before a few times, such as when a Qi charger was integrated into a Chromebook.

Monday, 8 April 2019

Get Great 3D Scans with Open Photogrammetry

Not long ago, photogrammetry — the process of stitching multiple photographs taken from different angles into a 3D whole — was hard stuff. Nowadays, it’s easy. [Mikolas Zuza] over at Prusa Printers, has a guide showing off cutting edge open-source software that’s not only more powerful, but also easier to use. They’ve also produced a video, which we’ve embedded below.

Basically, this is a guide to using Meshroom, which is based on the AliceVision photogrammetry framework. AliceVision is a research platform, so it’s got tremendous capability but doesn’t necessarily focus on the user experience. Enter Meshroom, which makes that power accessible.

Meshroom does all sorts of cool tricks, like showing you how the 3D reconstruction looks as you add more images to the dataset, so that you’ll know where to take the next photo to fill in incomplete patches. It can also reconstruct from video, say if you just walked around the object with a camera running.

The final render is computationally intensive, but AliceVision makes good use of a CUDA on Nvidia graphics cards, so you can cut your overnight renders down to a few hours if you’ve got the right hardware. But even if you have to wait for the results, they’re truly impressive. And best of all, you can get started building up your 3D model library using nothing more than that phone in your pocket.

If you want to know how to use the models that come out of photogrammetry, check out [Eric Strebel]’s video. And if all of this high-tech software foolery is too much for you, try a milk-based 3D scanner.

A Petite Pico Projector For Portable Pi

A few years ago, new, innovative pico projectors, influenced by one of the TI development kits, started appearing in Kickstarter projects and other various DIY endeavours. Those projects fizzled out, most likely due to the cost of the projectors, but we got a few laughs out of it: that wearable smartphone that projected a screen onto your wrist used the same technology.

But there’s a need for a small projector, a pico projector, or in this case a femto projector. It’s the Nebra Anybeam, and it’s a small projector that uses lasers, and it comes in the form of a Raspberry Pi hat. We would like to congratulate the team for shipping the ideal use case of their product first.

The key features of this pico projector address the shortcomings of existing projectors that can fit in your pocket. This uses a laser, and there’s no bulb, and the power consumption can be as low as 3 Watts. Power is provided over a micro USB cable. The resolution of this projector is 720p, which is sufficient for a quick setup for watching a movie, but the brightness is listed as equivalent to 150 ANSI lumens, about the same as small projectors from a few years ago.

But of course the big selling point isn’t the brightness or resolution, it’s all about the smallness of the projector itself. There is a developer’s kit, a Pi Hat, a fit-in-your-pocket version with an enclosure, and a ‘monster ball’ version of the Anybeam.

Hackaday Links: April 7, 2019

It’s April, which means all the people responsible for doubling the number of badges at DEF CON are hard at work getting their prototypes ready and trying to fund the entire thing. The first one out of the gate is Da Bomb, by [netik] and his crew. This is the same team that brought you the Ides of DEF CON badge, a blinky wearable multiplayer game that’s SPQR AF. Da Bomb is now a Kickstarter campaign to get the funding for the run of 500, and you’re getting a wearable badge filled with puzzles, Easter eggs, and a radio-based sea battle game that obviously can’t be called Battleship, because the navy doesn’t have battleships anymore.

Speaking of badges and various badge paraphernalia, there’s a new standard for add-ons this year. The Shitty Add-On V.1.69bis standard adds two pins and a very secure shrouded connector that solves all the problems of last year’s standard. [AND!XOR] just released a Shitty Brooch that powers all Shitty Add-Ons with a CR2032 battery. All the files are up on the Gits, so have fun.

You can 3D print anything if you don’t mind dealing with supports. But how to remove supports? For that [CCecil] has a great tip: use Chap stick. This is a print that used supports and it’s perfectly clean, right off the bed. By inserting a suspend (M600) command at the z-height of the top of the interface layer, then adding Chap stick on the top layer, everything comes off clean. Neat.

Speaking of 3D printing, here’s a project for anyone with the patience to do some serious modeling. It’s a pocket Soviet record player, although I think it’s more properly called a gramophone. It’s crank powered, so there’s a spring in there somewhere, and it’s entirely acoustic with zero electronics. Yes, you’re going to need a needle, but I’d be very interested in seeing somebody remake this using modern tools and construction materials.

Tracking Binary Changes: Learn the DIFF-erent Ways of the ELF

Source control is often the first step when starting a new project (or it should be, we’d hope!). Breaking changes down into smaller chunks and managing the changes between them makes it easier to share work between developers and to catch and revert mistakes after they happen. As project complexity increases it’s often desirable to add other nice to have features on top of it like automatic build, test, and deployment.

These are less common for firmware but automatic builds (“Continuous Integration” or CI) is repetitively easy to setup and instantly gives you an eye on a range of potential problems. Forget to check in that new header? Source won’t build. Tweaked the linker script and broke something? Software won’t build. Renamed a variable but forgot a few references? Software won’t build. But just building the software is only the beginning. [noseglasses] put together a tool called elf_diff to make tracking binary changes easier, and it’s a nifty addition to any build pipeline.

In firmware-land, where flash space can be limited, it’s nice to keep a handle on code size. This can be done a number of ways. Manual inspection of .map files (colloquially “mapfiles”) is the easiest place to start but not conducive to automatic tracking over time. Mapfiles are generated by the linker and track the compiled sizes of object files generated during build, as well as the flash and RAM layouts of the final output files. Here’s an example generated by GCC from a small electronic badge. This is a relatively simple single purpose device, and the file is already about 4000 lines long. Want to figure out how much codespace a function takes up? That’s in there but you’re going to need to dig for it.

elf_diff automates that process by wrapping it up in a handy report which can be generated automatically as part of a CI pipeline. Fundamentally the tool takes as inputs an old and a new ELF file and generates HTML or PDF reports like this one that include readouts like the image shown here. The resulting table highlights a few classes of binary changes. The most prominent is size change for the code and RAM sections, but it also breaks down code size changes in individual symbols (think structures and functions). [noseglasses] has a companion script to make the CI process easier by compiling a pair of firmware files and running elf_diff over them to generate reports. This might be a useful starting point for your own build system integration.

Thanks [obra] for the tip! Have any tips and tricks for applying modern software practices to firmware development? Tell us in the comments!

DIY Air Conditioner Built From Weird Donor Appliance

There are some parts of the world where living without air conditioning borders on unthinkable. But in more moderate climates, it isn’t all that unusual. [Josh’s] apartment doesn’t have central air conditioning — the kind that connects to a forced-air heating/cooling system. It does, though, have a water circuit for air conditioning, so he decided to hack a few experimental air conditioners.

He’s not starting completely from scratch. The two attempts he made at building his AC came from donor parts. The successful one started out as a hot water heater. The very first attempt didn’t quite work as well, using a refrigerator compressor and an evaporator from a baseboard heater. The flow control through the heat exchanger turns out to be very tricky, so [Josh] claims he mostly got ice right at the inlet and minimal cooling through the evaporator.

The more successful one works better but still has a problem with the evaporator freezing that he’s trying to solve. He’s looking for suggestions on how to make it work better. As much as we like a good hack, our advice is to move to a different apartment building.

We’ve seen other homemade coolers, but they are more like swamp coolers. If you just need to cool your desk, you might just get some ice in a metal can.

Restoring An HP LCZ Meter From The 1980s

We are fantastically lucky not only in the parts that are easily available to us at reasonable cost, but also for the affordable test equipment that we can have on our benches. It was not always this way though, and [NFM] treats us to an extensive teardown and upgrade of a piece of test equipment from the days when a hacker’s bench would have been well-appointed with just a multimeter and a 10MHz ‘scope.

The Hewlett Packard 4276A LCZ meter is, or perhaps was, the king of component testers. A 19″ rack unit that would comfortably fill a shelf, it has a host of functions and a brace of red LED displays. This particular meter had clearly seen better days, and required a look inside just to clean up connectors and replace aged batteries.

In the case is a backplane board with a series of edge connectors for a PSU, CPU, and analogue boards. Aged capacitors and those batteries were replaced, and those edge connectors cleaned up again. The CPU board appears to have a Z80 at its heart, and we’re sure we spotted a 1987 date code. There are plenty of nice high-quality touches, such as the individual 7-segment digits being socketed.

An after-market option for this equipment included a DC offset board, and incredibly HP publish its full schematic and a picture of its PCB in their manual. It was thus a simple process and quick PCB ordering to knock up a modern replica, with just a few component substitutions and single resistors replacing an HP specific encapsulated resistor pack.

As a treat we get a ringside seat for the set-up and alignment of the machine. The DC offset board gives the wrong voltage, which he traces to a voltage reference with a different tolerance to the original HP part. [NFM] makes some adjustments to resistor values, and is able to pull the voltage to the correct value. Finally we see the instrument put through its paces, and along the way have a demonstration of how capacitance of a ceramic capacitor can vary with voltage close to its working voltage. Even if you never have the need for an LCZ meter or never see an HP 4276A, this should be worth a watch. And if you now have an urge to find a bench full of similar treasures, take a look at our guide to old test equipment.