Showing posts with label MakeUseOf. Show all posts

Wednesday, 24 April 2019

Google Maps Now Shows Realtime EV Charging Data

Google Maps is making it even easier for owners of electric vehicles to find a charging station. This is because Google Maps will now display the availability of charging ports in the US and UK, with realtime data helping you to avoid an unnecessary diversion.

Google Maps Locates EV Charging Stations

In October 2018, Google Maps started showing the locations of EV charging stations in various countries around the world. And with the number of electric vehicles on the road increasing, this information is crucial for anyone keen to not run out of power.

Unfortunately, Google Maps was previously only providing static information, meaning you didn’t know until you arrived whether there were any free ports. However, now, Google Maps is adding realtime data, allowing you to see up-to-date information at all times.

Google Maps Adds Realtime EV Charging Data

In order to start seeing realtime data for EV charging stations, first, update Google Maps. Then, search for “EV charging stations” and you’ll see what’s available in the local area. You’ll also see the business the station is attached to, port types, and charging speeds.

According to The Keyword, this realtime data is currently only available in the US and the UK, and covers Chargemaster, EVgo, and SemaConnect. However, Google is promising to add data for Chargepoint, and will hopefully expand this feature to other countries too.

Google Maps Helps EV Owners Keep Driving

At the very least this will save you having to wait in line for a free charging port. And it could even save you from running out of power entirely. Which is a fear that’s surely preventing many would-be EV owners from finally switching to an electric vehicle.

If you have previously considered buying an electric vehicle, perhaps Google Maps’ inclusion of realtime data will help you make your mind up. But if you already own one, here are the must-have smartphone apps for EV owners.

Image Credit: CityofStPete/Flickr

Read the full article: Google Maps Now Shows Realtime EV Charging Data

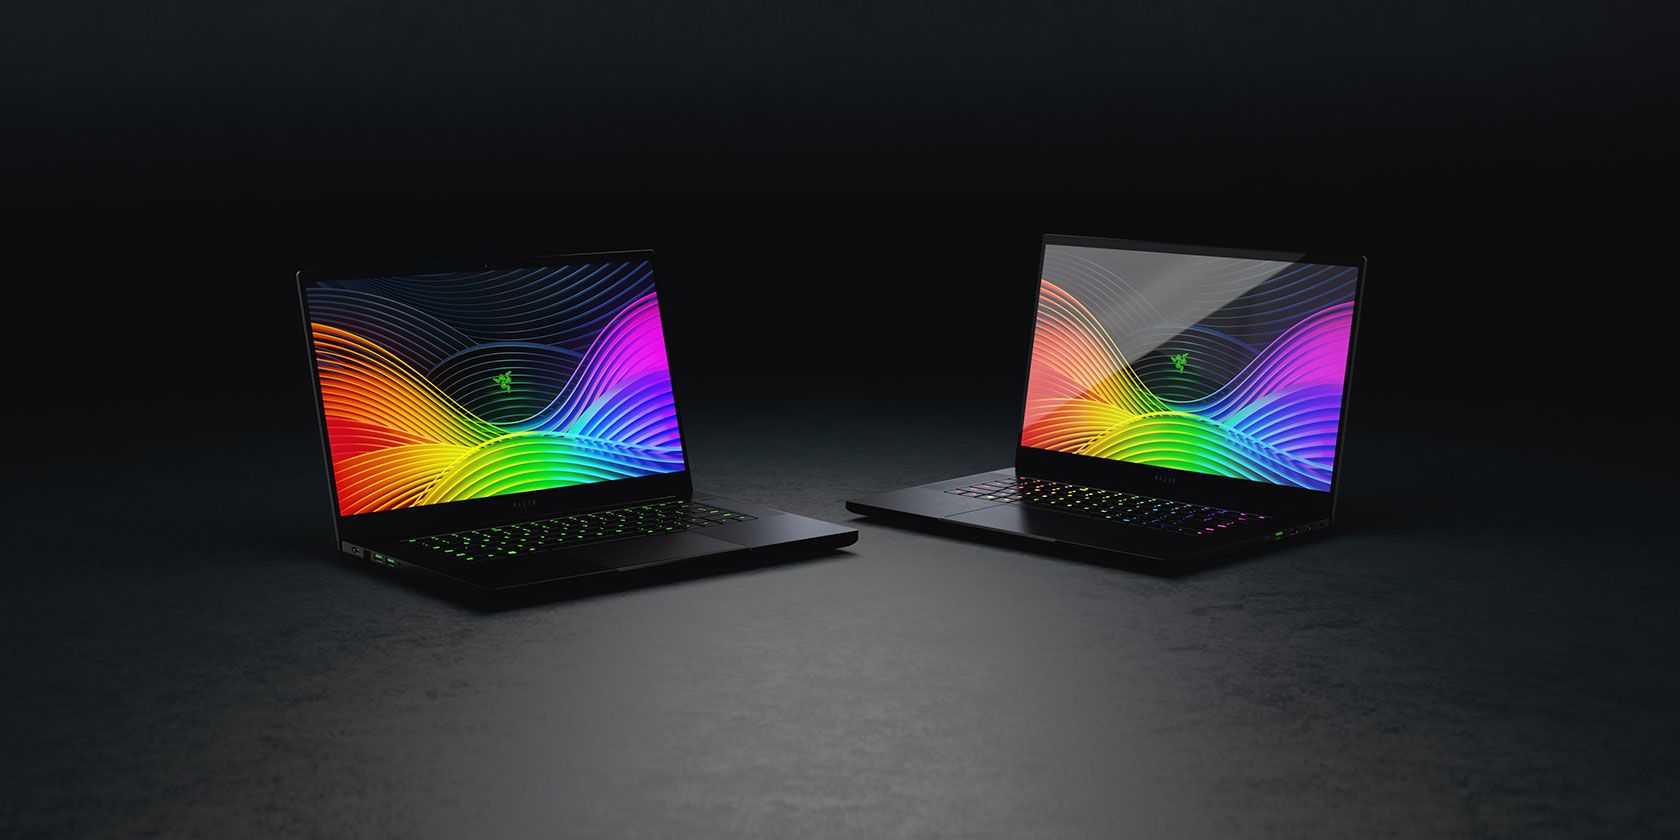
New Razer Blade 4K OLED Gaming Laptop Is Shockingly Expensive

Razer is making some big changes to its Blade lineup of laptops, including a new 4K OLED that features a price tag so high it’ll knock your socks off. Now, that’s not to say that it’s overpriced for what it offers, but it still hits you pretty hard when you realize that you’ll need to spend as much as some people invest in a used car in order to get your hands on one.

New Razer Blade 15 Models

There are quite a few new configurations offered with the new Razer Blade 15, but the one we’re really interested in is the 4K OLED touchscreen model. The screen should be absolutely gorgeous with such a high resolution and advanced tech. Of course, to have such a screen, Razer needed to include a powerful GPU, and it has included the new NVIDIA’s GeForce RTX 2080 in the laptop, which should allow it to run most of today’s advanced games without a problem.

For gamers who are less concerned with resolution and more interested in speed, Razer is also offering a 1080p version with a 240Hz refresh rate. That display will allow gamers to get a higher framerate at the cost of the 4K screen and OLED technology.

Additionally, the processor powering the new Blade is a 9th-generation Intel Core i7-9750H CPU clocked at 2.6GHz with Max Turbo speeds up to 4.5GHz. It also includes 16GB of RAM and a 512GB SSD. Whether you choose the 4K OLED or the 240HZ screen, you’ll get the same level of power from the processor, GPU, RAM, and SSD.

How Much Is New the Blade 15?

Obviously, all that power doesn’t come cheap, the 4K OLED model sells for a staggering $3,299.99. Gamers looking for the higher refresh rate can save a little bit (since there’s no OLED screen) and spend $2,999.99.

There are also less exciting configurations that don’t push gaming technology as far, and those start at $1,999.99. Either way, these are beasts of gaming laptops, and they come with price tags to match.

Read the full article: New Razer Blade 4K OLED Gaming Laptop Is Shockingly Expensive

How to Use Snapseed: 10 Tips for Better Snapseed Photo Editing

The 5 Best Airpods Alternatives

SiriusXM Essential Means You No Longer Need a Car

SiriusXM has launched a new streaming subscription package called SiriusXM Essential. While SiriusXM is best known for offering satellite radio in your car, Essential is just for streaming, meaning you no longer need to own a car to listen to SiriusXM.

SiriusXM Launches SiriusXM Essential

SiriusXM has launched Sirius XM Essential citing the fact that “approximately two-thirds of people in the U.S. (ages 12+) stream their audio entertainment”. SiriusXM has essentially realized it needs to start catering to people who don’t listen in their cars.

Essential is “for people who want to listen on a mobile phone, tablet, desktop, and on connected devices in the home including devices with Amazon Alexa, Amazon Fire TV, Chromecast, Apple TV, Roku, Sonos speakers, Xbox, Sony PlayStation and more”.

What Do You Get With SiriusXM Essential?

Essential gets you 200+ music channels, 100 SiriusXM Xtra channels, several sports talk channels, plus an “array of entertainment, news and comedy programming choices.” However, there’s no Howard Stern, or the NBA, NHL, and NCAA channels.

In the press release introducing SiriusXM Essential, SiriusXM’s Matt Epstein said:

“We’ve now created the Essential subscription as an appealing option for the many people, particularly younger consumers, who don’t have a car or don’t spend a lot of time in their car. The Essential package offers an attractive bundle of content at a competitively low price among streaming services.”

SiriusXM Essential costs $8/month, but you can try it first for $1/month for three months.

Streaming Is the Future of Everything

This is a good move by SiriusXM. All signs point to streaming being the future of, well, everything. So while there will still be people listening in their cars, offering access to streamers for a reduced price makes absolute sense.

In addition to launching its Essential subscription package, SiriusXM has wasted no time in making use of its acquisition of Pandora. So people only interested in podcasts can now listen to SiriusXM shows on Pandora without the need to pay a penny.

Read the full article: SiriusXM Essential Means You No Longer Need a Car

How to Change Which Facebook Friends Can See You Online

Facebook is quite open about its goals: the company dreams of a world in which everyone is connected at all times. Perhaps that’s why it’s so difficult to appear offline on Facebook Chat. The very idea of “offline” or “invisible” is the antithesis of everything the social network believes in.

However, being “invisible” isn’t for everyone. Thankfully, it’s possible to maintain a veil of privacy while still letting your closest friends and family know that you’re available to talk. Here’s how to decide which Facebook friends see you online and which don’t.

The process we’re going to show you is split into two parts:

  1. You need to organize your friends into lists.
  2. You need to decide which lists you want to display your online status to.

Using Facebook Friends Lists

To begin, you need to create some lists of friends. They’ll form the foundation for the rest of the process.

Of course, lists of friends are useful for far more than turning off your activity status for only some contacts. They also let you filter the content you share, create custom news feeds, and easily invite groups of relevant people to events.

Ideally, you want to put every one of your contacts into a list. It’s great from an organizational standpoint. However, for the purposes of this process, you can either make a “negative list” or a “positive list.” For example, you can give your new list a name like “People I Am Invisible To” or “People Who Can Always See I’m Online”.

Remember, your lists have no bearing on who can send you direct messages. Anyone who you’re friends with can reach out to you privately. If you don’t want that either, go to Settings > Blocking > Block Messages and enter the person’s name.

How to Create a Friends List

dans facebook lists

To make a new Friends list (and to see which lists already exist), log into your Facebook account and select Friend Lists in the left-hand panel.

You’ll immediately notice Facebook has already created some lists on your behalf. The lists can be split into three categories: Preset lists, Smart lists, and Custom lists.

Preset lists are lists Facebook has created for you, such as Close Friends, Acquaintances and Restricted (friends who are only able to see public posts).

Smart lists are the other lists Facebook has created for you. They are populated based on your location, where you’ve gone to school, where you’ve worked, your family members, and so on.

Custom lists are lists that you create yourself.

You can edit the members of all the pre-made lists by clicking on the list’s name, expanding the Manage List drop-down menu (in the upper right-hand corner of the page), and selecting Edit List.

Note: You cannot delete pre-made lists, but you can hide them from your account by archiving them.

create list on facebook

To make a new list, click on Create List at the top of the page. Give the list a name and enter some of your friend’s names in the Members box. When you’re ready, press Create.

You’ll now be taken to the list’s main page. In the upper right-hand corner, you can add more people to the list. Make sure you’re completely happy with the member list before moving on.

add people to facebook list

How to Show (or Hide) Your Online Availability

Once you’ve made your lists, it’s time to either show or hide your active status on Facebook.

There are a couple of methods you could use to do this. You can either decide who specifically can’t see you online, or you can decide who specifically can see you online. It depends on the approach you want to take.

Remember, if there are only a few specific people that you don’t want to talk to, singling them out by name will fit your needs.

Whichever approach you take, you need to make some changes in the settings of Facebook Chat.

Edit the Facebook Chat Settings

Return to the Facebook homepage. On the right-hand side of the screen, you’ll see the chat box. Click on the Gear icon in the lower right-hand corner to begin.

On the menu, click Advanced Settings. A new window will pop up. You will see three options:

  • Turn off chat for some contacts only
  • Turn off chat for all contacts except
  • Turn off chat for all contacts

The three options are self-explanatory. If you want to restrict access to a few people, or you made a list of people you want to restrict, choose Turn off chat for some contacts only. If you only want to allow access for a select group of people or lists, select Turn off chat for all contacts except.

facebook chat settings

When you click on one of the two options, Facebook will prompt you to enter the name of a person or the name of a list. Start typing the name of the list you just created, and the box should automatically populate itself.

The final option makes you appear offline to everyone.

Note: If you have a friend in two (or more) lists and only one of those lists is forbidden from seeing you online, the friend who’s on both lists can still see you.

Other Settings

When you click the Gear icon in the chat box, there is one other setting which is worth paying attention to: Turn On/Off Video and Voice Calls.

If the setting is turned on, any of your Facebook friends will be able to try and start a video or voice call with you. It is not affected by the process we just detailed.

other chat settings on facebook

Use Facebook Lists to Manage Who Can See You Online

In this article, we’ve shown you how you can use Facebook lists to manage who can and cannot see that you’re online on Facebook Chat.

To summarize:

  1. Make a new list.
  2. Add either people you do or do not want to see that you’re online.
  3. Edit the Facebook Chat setting to permit or block a list from seeing your status.

To enact more controls on the social networking site, check out how you can change the ads you see on Facebook and learn how to appear offline in Facebook Chat.

Image Credit: jhansen2/Depositphotos

Read the full article: How to Change Which Facebook Friends Can See You Online

How to Create a Bootable USB Drive From Your Windows CD

bootable-usb-windows

Do you have a Windows CD or DVD, but cannot use your optical drive to install your Windows operating system on your new computer? Maybe you are worried about CD/DVD rot and want to create a backup?

Instead of a disc, you can use a USB flash drive to install Windows. Flash drives are smaller, have more storage, and if you use the right tool, you can boot multiple operating systems from the same drive.

Here’s how you create a bootable USB flash drive from your Windows installation CD.

The Benefits of USB Flash Drive Installation Media

There are several situations where USB flash drive installation media is better than a DVD or CD:

  • You can easily create backup installation media.
  • Significantly faster installation rate versus regular installation media.
  • Keep your original installation media in pristine condition.
  • Easy to carry multiple operating systems on a single USB drive.

Our relationship with Windows CDs and DVDs is different, too. For instance, you can purchase an official Windows 10 USB flash drive instead of a DVD or CD. Discs are still available but are far from the only method of installation. Furthermore, if you purchase new hardware with Windows preinstalled, there’s a chance you will never have installation media unless you make it yourself. (Read on to find out how!)

Copy Your Windows Installation Disc Using WinToFlash

If you have a Windows installation disc that you want to update to a USB flash drive, WinToFlash makes it an easy task to create a CD to USB bootable drive. The WinToFlash Lite edition will create a bootable USB flash drive directly from your existing Windows installation CD. Here’s how you do it.

  1. First head to the WinToFlash site, then download and install the WinToFlash Lite edition. After installation, WinToFlash will open automatically.
  2. Accept the EULA, and view the non-intrusive advert before continuing.
  3. Make sure your Windows installation disc is your optical drive, as well as the USB flash drive you want to copy your installation too.
  4. Now, select Windows Setup Bootable USB Wizard, then I have CD inserted into my computer…, followed by Next.
  5. On the next page specify the location of your Windows installation disc in the first box, and the destination USB flash drive in the second. Select Next to confirm your settings, agree to the terms of the license agreement, and Continue.

novicorp wintoflash copy windows installation

Please be aware that this process will format your USB flash drive and you will lose all existing data permanently.

The Windows CD to bootable USB flash drive copy process can take some time to complete, so go and pop the kettle on.

WinToFlash Multiboot

WinToFlash also has multiboot support. You can build a customized bootable USB drive filled with Linux distros, recovery disks, and other handy tools. The only limit is the size of your USB drive.

Note: WinToFlash Lite will only allow two ISOs on your multiboot. I’ve curated a comprehensive list of multiboot USB tools that do the job much better, and without restriction.

  1. Head back to the Wizard mode tab and select Mutiboot USB Drive Creation Menu.
  2. On the next screen, select Add. This opens the Add new item panel. Like other multiboot USB drive tools, WinToFlash has a long list of potential tools. Scroll down the list and select a tool.
  3. The option to Download selected ISO now will appear. Choose this option to download the latest version of the selected tool or OS. Alternatively, you can select and add ISOs already stored on your computer.
  4. Complete your selection and select Run.

novicorp wintoflash multiboot

Create Windows ISO From Original Installation Media Using ImgBurn

If you prefer a more manual approach to rip your Windows installation media, you can use ImgBurn. ImgBurn is a great free tool that you can use to write an image file to disc or create an image file from an existing disc.

  1. Head to the ImgBurn website. Download and install ImgBurn.
  2. After installing, open ImgBurn. Make sure your original Windows installation media is in your optical drive.
  3. Select Create image file from disc.
  4. Select the Windows installation media drive source, then set the Destination
  5. Hit the Read button to begin the process.

imgburn rip windows installation disc

The disc image creation process depends on the write speed of your optical drive, so this could take a moment.

Once your Windows installation media image file (ISO) finishes ripping, you can move onto the next section where you will use Rufus to create a bootable USB flash drive.

Burn Windows Installation ISO to USB Flash Drive Using Rufus

Now you can burn the Windows installation ISO ripped from your original installation disc as a bootable USB flash drive. Rufus is a handy tool for all manner of bootable USB burning tasks. It is simple and gets the job done—a great combination! Here’s what you need to do:

  1. Head to the Rufus website, then download and install the latest version of the tool.
  2. Open Rufus. Under Device, select the USB flash drive you want to use.
  3. Under Boot Selection, hit Select, then browse to the location of the Windows installation ISO created in the last section.
  4. Set a new volume label, so you know what’s on the USB flash drive in the future.
  5. Select Start.

rufus boot selection option

Wait for Rufus to complete the burn process Once complete, you have successfully manually moved your Windows installation disc to a bootable USB flash drive. Better still, you made a Windows installation media backup in the process (the ISO from the last section).

Use the Windows 10 Media Creation Tool

WinToFlash is great for automating the disc to USB flash drive process. ImgBurn and Rufus are great if you want to do it yourself. But you don’t have to use either of those methods. At least, not if you don’t want to and you’re using Windows 10.

The Microsoft Media Creation Tool makes the process of downloading a Windows ISO simple. Accordingly, the Media Creation Tool automatically downloads an ISO to your specification, eliminating the need for copying physical media to your computer, then onto your USB flash drive.

Here’s how you do it:

  1. Download and run the Windows 10 Media Creation Tool. Accepting the licensing agreement.
  2. Select Create installation media for another PC.windows media creator option
  3. Select the language, edition, and architecture of your operating system. The Media Creation Tool offers recommended settings. However, if you are downloading for a different system, you may need to change these.
  4. Next, choose either USB flash drive or ISO file. The latter creates an ISO file with the details you entered on the previous page, which you can install using a USB burning tool like Rufus.
  5. In this case, choose USB flash drive and continue.
  6. Select the USB flash drive, then create the installation media. The Media Creation Tool will download the latest version of Windows 10, so it will take a moment.

windows media creator set architecture

Can I Boot From USB?

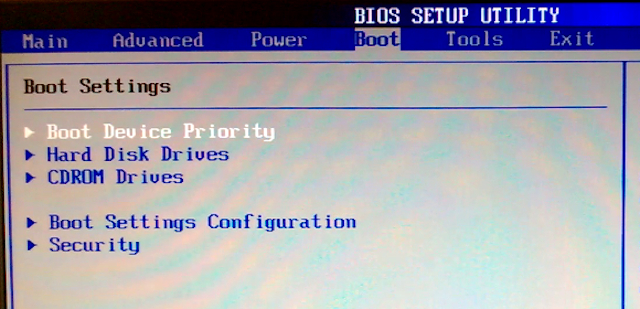
This is a very common question. It is largely system specific but can be altered by the user via the BIOS. This is controlled by the boot sequence.

bios utlity boot sequence option

Your system will usually seek to boot from wherever your OS is installed. The drive containing your main OS will be the first option in the boot sequence. It is possible to manually override this, instead of booting from a USB drive containing new installation media.

BIOS configurations are different for each manufacturer. I would suggest searching the internet for “[hardware manufacturer] BIOS tutorial/boot sequence.”

Create a Bootable USB from a CD or DVD

You’re now ready to create a bootable USB flash drive from your Windows installation CD or DVD. This installation process should speed up your next clean installation while giving you the chance to get rid of some of those pesky old discs. Just remember to write down your license codes and keep them in a safe place!

Can’t find your old license codes? Here are your options for a cheap and legal Windows license.

Read the full article: How to Create a Bootable USB Drive From Your Windows CD

Spark Is the Best Google Inbox Alternative: 11 Reasons Why It’s Worth a Look

Linedock: The Best MacBook Pro Accessory

Our verdict of the Linedock 13":
The Linedock is the gorgeous Swiss Army knife of MacBook accessories. If the SD slot speeds were improved and it sprouted a LAN port it would be perfect.
910

Apple’s recent charge more for less philosophy has led to some MacBook users feeling a little unsatisfied with the lack of connectivity. Except for the headphone jack, MacBooks are shipped with USB Type-C exclusively. Can the Linedock satisfy your connectivity needs? Let’s find out.

Specifications

  • Number of USB-C Ports: 3
  • USB-C Spec: USB 3.2 Gen 1 (5 Gbps) / DisplayPort
  • USB-C Power: Power Delivery 2.0 / 5V – 3A / 9V – 3A / 15V – 3A / 20V – 5A
  • Number of USB-A Ports: 3
  • USB-A Spec: USB 3.2 Gen 1 (5 Gbps)
  • USB-A Power: Qualcomm QuickCharge 3.0 (12W)
  • Pass-through Charging: Yes / 100W
  • Display: Single Display / 4K @ 60Hz
  • USB-C Video: Yes
  • HDMI Video: Yes / HDMI 2.0
  • Mini DisplayPort: Yes / DisplayPort 1.2
  • SD Card Slot: Yes
  • Battery: 20,000 mAh / 71.61 Wh
  • Battery Output: 60W (20V / 5A)
  • Pass-through Charging: 100W (20V – 5A)
  • Internal Storage: 0GB / 256GB / 1TB
  • Internal Storage Spec: SATA III (6 Gbps) – M.2 2280 / Bootable
  • Dimensions: 11.97 x 8.36 x 0.35 inches (30.41 x 21.24 x 0.9 cm)
  • Weight: 2 pounds (912 g)
  • Colors: Space grey / Black
  • Price: $399 with 256GB storage

Overview

The Linedock ultimately aims to replace three things. A USB-C dongle, a power bank, and an external SSD. These are probably the first few items you purchase to kit out any laptop you may own, especially the MacBook.

linedock-side

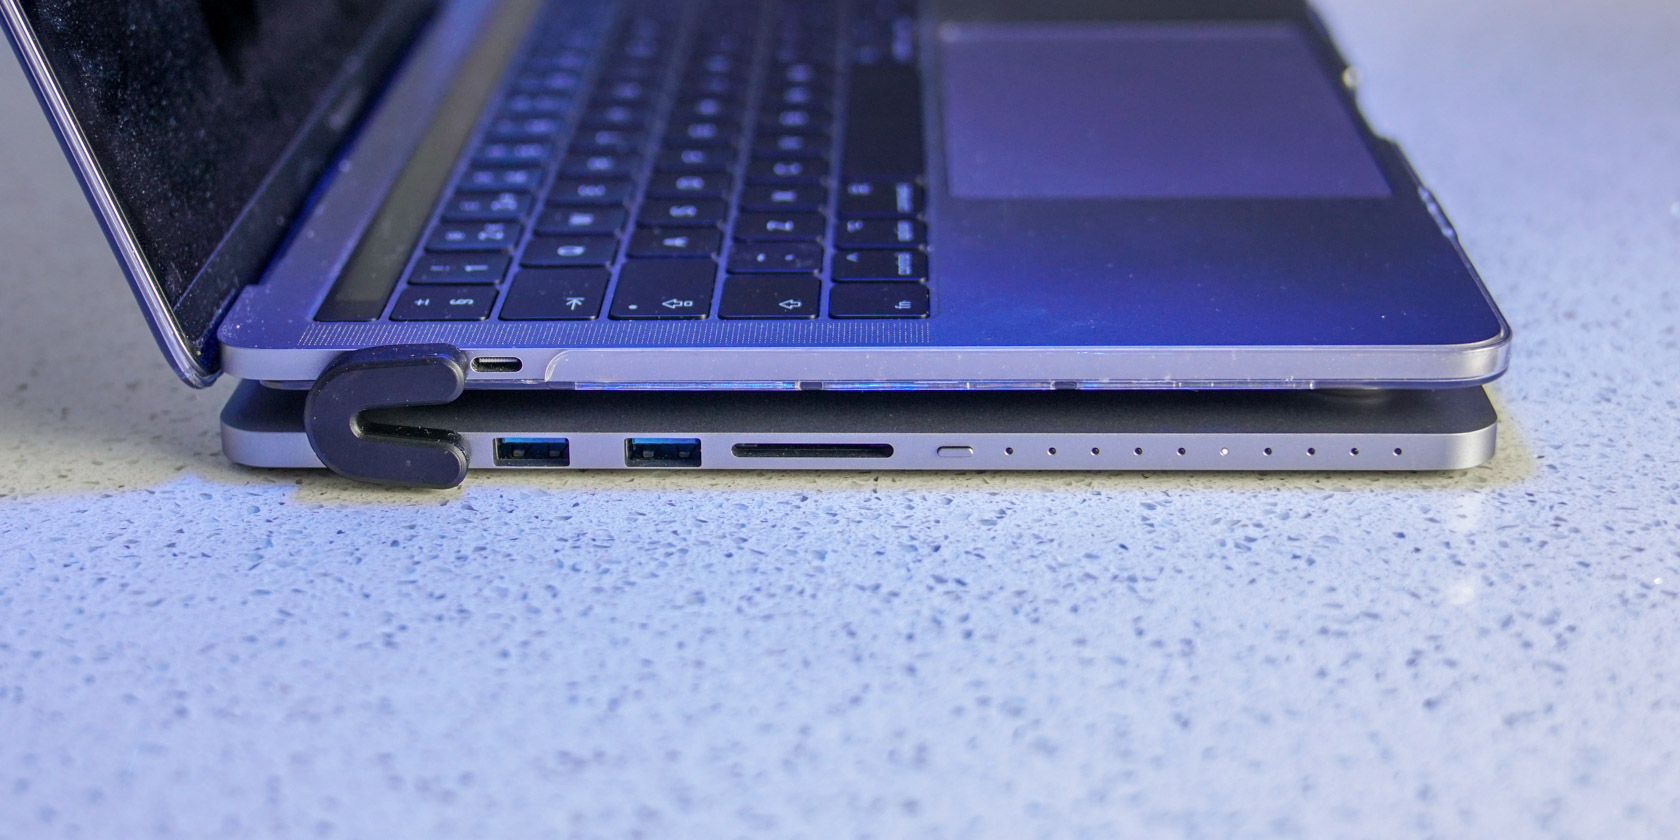
The device is absolutely gorgeous. It’s designed and manufactured from aluminum and looks like a MacBook that’s had its screen removed. Its dimensions make it no larger than the MacBook as well so that when stacked it doesn’t look out of place. Stacking also means it will take up less real estate on your desk compared to a tangled mess of dongles.

Line also sell a purpose-built U-shaped USB-C connector, which further adds to the minimalism. It’s worth noting that you should plug in the U module on the left side of your MacBook to avoid blocking the headphone jack, however, it works on either side.

linedock-box

The box includes the Linedock, reading material, and a cheeky graveyard to store your old dongles. The optional magnetic and U modules arrive in little tins and are almost certain to put a smile on your face. Line has put a lot of effort into the packaging, and it shows. Good start!

Connectivity

The Linedock is garnished with a delicious selection of ports. There are three USB-C, three USB-A ports, and an SD slot. There’s also HDMI and Mini DisplayPort if you’d like to connect to an external display. You could also take advantage of a USB-C display if you so desire.

linedock-u-cable

You can only use a single display at a time, and it’s limited to 4K at 60Hz. This is something to consider if you require dual display or any resolution above that. So unless your monitor has VGA or DVI, the Linedock has you covered.

The only port that the Linedock doesn’t have is Ethernet. This may not be a big issue for everyone, but it was for me. All of my video editing is done on my server, and Wi-Fi speeds can’t cope with the bandwidth required. If your workload is heavily reliant on wired ethernet, you might need an ethernet adapter, but that’s counter-intuitive.

Other than that, the Linedock meets any use case. All ports are easily accessible regardless if you’re in stacked or unstacked mode. The best part is that your external SSD isn’t taking up one of your precious ports because it’s built right into the Linedock.

Storage

When purchasing a Linedock, you can choose between no storage, 256 GB, and 1 TB versions. The built-in storage comes from a SanDisk M.2 SSD which is connected via SATA III. Write speeds topped out around 225 MB per second with read speeds reaching around 250 MB per second.

The SSD is automatically detected when connecting the Linedock and can also be used as a boot drive. This means you could dual boot your Mac with Windows or even another instance of macOS. The Linedock also makes a great place to store your TimeMachine backups.

linedock-open

Another anti-Apple pattern is making the Linedock easy to open up if you’d like to change the SSD. If you do open up your Linedock, it will greet you with a brilliant little light show. Line has gone through the trouble of painting a world map on the internals and paid homage to the people who created it by the clever use of colored LEDs.

linedock-sd-card-speeds

The SD Card slot speeds were a little disappointing. Read and write speeds topped out around 20 MB per second. This is far slower than a typical USB SD Card reader. While the Linedock may be compatible with the fastest SD cards, it certainly doesn’t have the speed to match. There’s definitely room for improvement when it comes to the storage speeds, but it may not be a deal breaker for you if you seldom use SD cards.

Power

Capacity and Output

The Linedock sports a 20,000 mAh battery which should be enough to support a small colony on Mars. Even after fully charging a 13″ MacBook Pro there will still be around 6000 mAh left to charge other devices.

linedock-battery

Power output for a single port tops out at 60W meaning it can supply enough power to charge your MacBook quickly. The Linedock also supports pass-through charging through the rear port for up to 100W. You can charge up to six devices simultaneously, and power is distributed quite cleverly.

Think of the total power available, either 60W or 100W, as a budget so to speak. So if you had the following devices plugged in:

  • Linedock Internal Battery (60W)
  • iPad (12W)
  • iPhone (18W)
  • Nintendo Switch (18W)
  • 13″ MacBook Pro (60W)

The total watts required to charge all devices to 100% will be 168W. If you connect a 60W charger to the Linedock, it will charge all of the above by sharing the power and if necessary will wait until one or two devices are fully charged to charge the remaining ones. If there is any power left, it will be used to charge the internal battery of the Linedock. This makes the Linedock an intelligent power distribution system as well!

Saiyan Mode

If you’re familiar with the Dragonball series you should know what Saiyan is. Charging power output is doubled.  Saiyan mode works by double-clicking the battery indicator button which will turn the LEDs yellow. The rationale behind this is that your MacBook needs only 30W of power to sustain its battery life. But you may want to actually fast charge it which is what Saiyan mode is for.

linedock-saiyan

This does mean the Linedock and your MacBook will get run a little hotter than usual, so you will need to use it in unstacked mode. One thing to note about unstacked mode is that you will require a decent USB-C Cable in order to use both power and data transfer from the Linedock. The standard cable that Apple sells just isn’t good enough, unfortunately. On the bright side, the one that Line sell is perfect!

Compatibility

The Linedock is marketed for the 2017 or 2018 13″ MacBook Pro specifically. This is because of its size and aesthetic. That being said there are cases which people have used Windows laptops from Lenovo and Huawei and have had no issues at all. Everything from power to the ports works exactly as intended.

The best thing about the compatibility is that the Linedock supports both EMUI and DEX. So if you had a phone like the Samsung Galaxy S10 or a Huawei Mate 20, you could connect it to the Linedock and use your phone with an external display, mouse, and keyboard. Everything from the internal storage and SD card slot become accessible via your phone as well!

If you own a 15″ MacBook pro and feeling a little left out, worry not. Linedock plans to release a 15″ version which will beef up the power specs and cooling required for the more powerful 15″ MacBook Pro.

The Verdict

If you had to tally up the price for everything the LineDock replaces such as a power bank, external SSD, dongles, and power distributor you’d end up paying roughly $260, which is around $150 less than the cost of a LineDock.

However, this isn’t really a fair comparison as none of those devices are going to provide you with the one cable experience or space saving that the Linedock has. You’re paying a premium for a premium device that looks and feels the part. The devices falls a little short in SD card slot speeds and could maybe do with a wired ethernet port.

There are undoubtedly purpose-made devices that outperform the Linedock, but there are none that boast the unbridled versatility or aesthetic. It really is the Swiss Army knife of MacBook accessories. If you’ve just purchased or are thinking about buying a new MacBook Pro, the Linedock should definitely be on your radar.

Most of all the company behind the Linedock make an effort where it counts. Little things like messages on the battery, the overall presentation, naming conventions, and appreciation for their team go a long way in making you feel special. They aim to be exceptional and have indeed come up with an exceptional product.

Enter the Competition!

Linedock Giveaway

Read the full article: Linedock: The Best MacBook Pro Accessory

The 7 Best Wi-Fi USB Adapters

Monday, 22 April 2019

5 Sites and Apps to Find Movies & TV Shows to Watch on Netflix

find-movies-netflix

The question most of us have in our free time isn’t whether or not to stream something, it’s, “What should I watch on Netflix?” Here are a few quick ways to get an answer.

Netflix is constantly tweaking its interface to tell you to watch certain shows and movies, but sometimes, it seems like Netflix pushes its own productions too strongly while ignoring more worthy options. Third-party recommendation engines, like those in this list, can be better at finding something more suited to your palate.

1. What The Hell Should I Watch On Netflix (Web): One Pick At a Time

What the hell should I watch on Netflix recommends movies and TV shows quickly

If you don’t want to spend time tweaking a bunch of filters to find exactly what you’d like, this is the simple option. What The Hell Should I Watch On Netflix (WTHSIWON) focuses on speed and simplicity, giving you one pick at a time.

First, choose whether you want movies, TV shows, or anything at random. In the second step, choose the genre. You’ll immediately get a recommendation, complete with a trailer and a recommendation.

If it’s not what you’re looking for, WTHSIWON offers a few other options at the end of the recommendation, each with an alternative to something you might have found off-putting about the main choice.

WTHSIWON is quick and clutter free. The curated lists of movies are generally rated well on movie databases.

2. FlixWatch (Web): “Best of Netflix” Lists, By Region

Flixwatch recommends "best of" lissts for different genres on Netflix

Maybe you don’t want one recommendation but prefer to go through a list of them and choose your favorite? FlixWatch has those readymade lists for different categories, all sorted by the country you’re in.

Each country’s sub-section has lists for the 50 best movies or TV shows across genres like crime, action, comedy, family, drama, documentaries, and so on. The list has the movie’s or show’s title, a brief description, and the cast and crew details.

You can click “More Info” to find out things like the IMDb and Metacritic rankings, but I think it’s better to skip directly to the “Watch On Netflix” link which has better details, including trailers.

3. Compare Movies (Web): Compare Movies and TV Shows

Compare multiple movies and TV shows side by side

Your friends have recommended a few things. You need to decide what to watch next. Put them all in Compare Movies to see their major details next to each other, to make it easier to choose.

Whether it’s a movie or a TV show, Compare Movies helps in figuring out the next thing to stream. Each movie or show appears as a long vertical column, and you can add as many other columns next to it as you like. The entire comparison can be shared as a link with anyone.

Details include things like what awards the movie has won, how many seasons a show has, the major cast and crew, and its IMDb and TMDb ratings. Quick links for videos and images will take you to YouTube playlists of trailers or best moments.

4. Shufflix (Web): Random Episodes of Favorite TV Shows

Shufflix plays a random episode from your favorite TV show on Netflix

In the pre-streaming days, there was a certain charm to switching on your TV to find a rerun of an episode from one of your favorite TV shows. You weren’t picking what to watch, it was random; but you knew it was enjoyable. Shufflix adds that serendipity to Netflix.

The website first asks you to choose the country you watch Netflix in, and then shows a catalog of the many TV series available in your region. It’s a mix of different genres, and all are generally popular shows.

Pick one, and Shufflix chooses a random episode from it, along with the basic information of what happens in that episode. You can choose to watch the episode, or ask Shufflix to recommend another.

Shufflix works on both computers and mobile browsers. Tap the “watch now” button on mobile and it’ll directly open the episode in your Netflix app.

5. Netflix-Codes (Web): Easily Browse Secret Netflix Categories

Netflix Codes is the easiest way to browse netflix's secret categories

Netflix’s worst-kept secret is that it has a large number of hidden categories to classify and tag movies and shows, which are never shown to the user. These secret codes help find new content, but it has always been a pain to input and browse them. Until Netflix Codes came along.

This site is the most eye-pleasing and organized way to check all the secret categories in Netflix. You get larger categories (for example: action and adventure, thriller, documentaries, comedies, etc.) as well as sub-categories in each (for example: martial arts movies, LGBT dramas, deep sea horror movies, military documentaries, etc.). The link is available right next to it, which you can click and browse in Netflix.

You’ll be surprised by just how many classifications Netflix has, which is unavailable for a regular user to browse through the app or web interface. Netflix Codes is a game-changer to find things you’ll like.

Recalibrate Your Netflix Recommendations

All of these alternatives wouldn’t be needed if Netflix’s recommendations worked well. Nonetheless, Netflix has a strong algorithm that figures out your tastes in movies and TV shows, based on what you watch and your ratings. But over time, this can go out of whack.

When you have some free time, it would be worth your while to recalibrate your Netflix recommendations, so that they are more helpful. Till you find that time, you can stick to the above apps and sites to quickly find something worth watching.

Read the full article: 5 Sites and Apps to Find Movies & TV Shows to Watch on Netflix

Saturday, 20 April 2019

5 Ways to Transfer Data From PC or Laptop to Android Phone

While phones have become the main computing device for many, most of us still use laptops regularly, too. This means we often need to move files from a PC to an Android phone.

But what’s the best way to do it? And does the best method differ if you’re moving lots of small files or a handful of massive ones? Let’s take a look at the best ways to get data from your laptop or PC to your Android phone.

1. Using a USB Cable

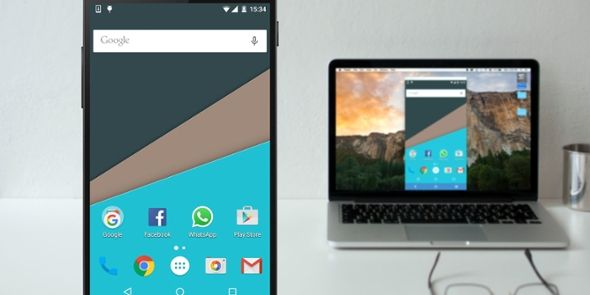
The old standard for moving data from your laptop to your phone is via USB. It’s still quick and easy, as long as you’ve got a compatible cable on hand. Unfortunately, the move to USB-C on most modern phones has left a lot of our old cables redundant. They often don’t come with the USB-C to USB-A cable you need for most laptops.

But assuming you have got one, then it’s simple to do. On Windows or a Chromebook:

  1. Connect your phone.
  2. Tap on the notification Android shows labeled Charging this device via USB.
  3. Under Use USB For, select File Transfer.

That’s it. A file transfer window will open on your computer, showing your phone (and SD card if you’ve got one). Then you can start copying your files across.

copy files to android over usb

The instructions are almost the same on a Mac, but you will need to install the Android File Transfer software first.

This method is good for copying large amounts of data. Try it when you want to transfer some movies or your entire music collection. It makes it easy to move files to your phone’s SD card as well.

2. Through Your Cloud Accounts

The Google account you’ve got set up on your phone gives you access to 15GB of cloud storage space through Google Drive. This gives you a convenient way to move files between your laptop and phone.

You need to install the Google Drive app on your laptop. If you’d rather, you can use Dropbox or Microsoft’s OneDrive, as they all work pretty much the same way.

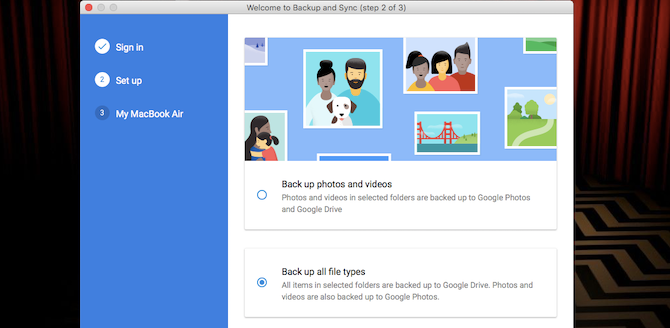
When you set up Google Drive, you need to sign in first. Then select Back up all file types and click Next.

back up all file types google drive

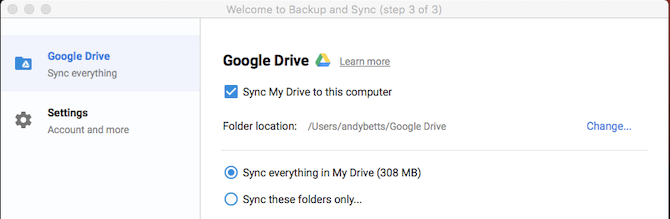
On the next screen, choose Advanced Settings at the bottom. Select Sync My Drive to this computer, then click OK.

sync google drive folder

This creates a Google Drive folder on your computer. Everything in this folder will sync to and from your Drive account. So to upload files to your phone, just move them into the Drive folder. Open the app on your phone and they’ll be there after syncing.

The main caveat to remember here is that the files shown in your Drive app are not stored on your phone. If you try to open one, it needs to download first—and a gigantic file can take a big bite out of your monthly data allowance.

To get around this, you have two options for downloading the files you need to your phone. Select a file, and from the menu choose either:

  • Make available offline. This downloads the file for you to view offline within Drive. Any changes you make to it will sync next time you go online.
  • Download. This saves a new copy of the file to your Downloads folder, and you can open it in any compatible app. However, any edits you make won’t sync—you need to re-upload the file to your Drive account.

download google drive files

A lack of free space is the main limitation for this solution. You can always set up an extra account though, and it is possible to transfer files from one Google Drive account to another.

3. By Email and Messaging Apps

Emailing files to ourselves is hardly the most efficient way of moving data from a laptop to a phone, but we’ve all done it at one time or another. It works for quick sharing of files when you can’t use any of the other methods.

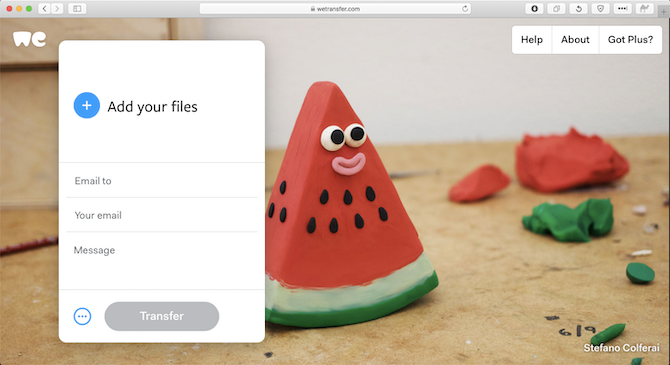
You’re limited to 25MB attachments in Gmail. If you need something larger, check out WeTransfer. That allows you to send files up to 2GB for free, with no registration.

send large email attachments

Head to wetransfer.com, enter your email address, then drag your files into the browser window and send. You’ll then receive an email on your phone containing a link where you can download the files.

Files are encrypted for security, and they get deleted after seven days. If you want to delete your files sooner, or leave them up for a longer time, you need a Pro account.

If for some reason you don’t like WeTransfer, don’t worry. There are many other ways to send large files as email attachments.

4. Using Bluetooth

When you’ve got a few smaller files you need to move to your phone, Bluetooth is a good way to go. It’s pretty easy, too, once you’ve got it set up.

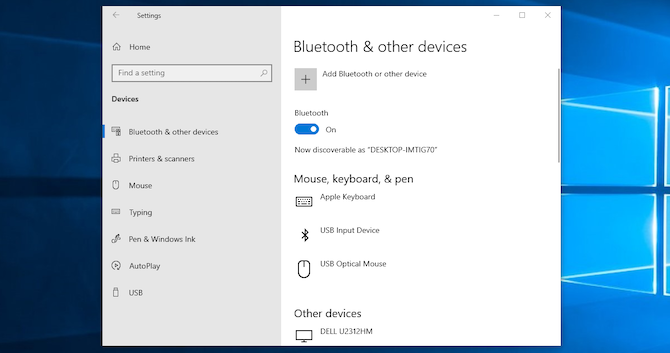
To send a file over Bluetooth from your Windows 10 laptop to your phone, you first need to pair the two devices. Go to Settings > Devices and hit the toggle to turn on Bluetooth. Make sure it’s also enabled on your phone.

set up bluetooth

Now go to Add Bluetooth or other device > Bluetooth to start scanning. After a short delay, your phone will show up. Select it, then click Connect on your PC and Pair on your phone to complete the process.

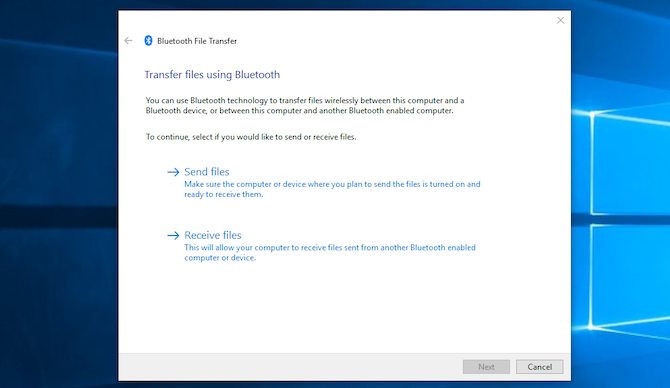
To share a file over Bluetooth, go to Settings > Devices > Send or receive files via Bluetooth > Send files. Then choose the file you want to share.

send files over bluetooth

For other platforms, the names of the menu options will be different, but the process is the same. First you need to pair, then you can share.

Bluetooth is slower than some of the other methods we’ve listed (especially Wi-Fi, next). It’s best for smaller files and casual use.

5. Using Wi-Fi

When you need to move large amounts of data to your phone on regular basis, you cannot beat Wi-Fi. As long as you connect your phone and laptop to the same network, you can move files quickly and securely.

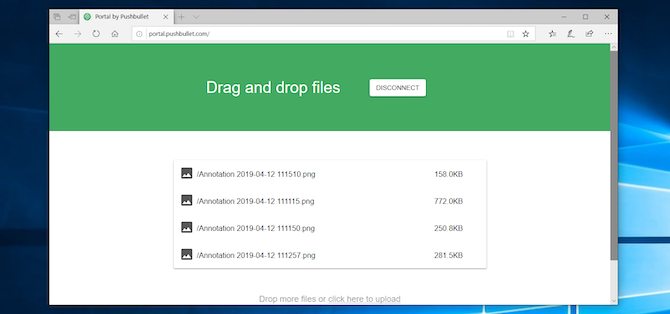
To copy files over Wi-Fi you need a special app on your phone, but nothing extra on your laptop. We recommend Portal by Pushbullet, which is free and requires no signup. It works with any platform: Windows, Mac, Linux, or Chrome OS. Download and install on your Android device to begin.

Next, open a web browser on your laptop or desktop and go to portal.pushbullet.com, where you’ll see a unique QR code.

set up portal

Now open Portal on your phone and tap Scan. When the camera launches, point it at the QR code to scan it. This establishes a direct wireless connection between your phone and desktop or laptop. It’s only temporary, so next time you run the app you’ll need to do the scan again to re-pair.

Finally, drag your files into the browser window and they will instantly begin uploading to your phone.

share files over wifi

By default, Portal places images and music into your phone’s Photos and Music folders. Everything else goes into the Portal folder. You can leave them there and access them through the Portal app, or you can download one of the best Android file managers and move the files to any other folder (and even to your SD card).

Portal is convenient because you don’t need to install it on your laptop. If you want more features, check out AirDroid, which among other uses lets you send text messages from your PC. There’s also Feem, which makes it easy to share files across all different types of devices.

More Ways to Move Your Data

There are more methods to move files between devices. You can use your SD card or a USB flash drive with an On-The-Go cable if your phone supports them. Or for ultra-techie solutions, try using FTP with the Wi-Fi FTP Server app, or even utilizing Network Attached Storage (NAS). With this option, you share a single hard drive with all the devices connected to your network.

But for most people, the five methods outlined above are the best ways to move data from your laptop to your Android phone. Some are better for quickly sharing small files, and some excel at moving huge amounts of data.

Of course, the more devices we have, the more we need to share files between them. Our guide to the fastest file transfer methods between PCs and mobile devices shows you how to get all your gear working in sync.

Read the full article: 5 Ways to Transfer Data From PC or Laptop to Android Phone

Arduino Programming for Beginners: Traffic Light Controller Project Tutorial

The Arduino traffic light is a fun little project that you can build in under an hour. Here’s how to build your own using an Arduino, and how to change the circuit for an advanced variation.

What You Need to Build a Traffic Light Controller

Apart from the basic Arduino, you’ll need:

  • 1 x 10k-ohm resistor
  • 1 x pushbutton switch
  • 6 x 220-ohm resistors
  • A breadboard
  • Connecting wires
  • Red, yellow and green LEDs

Almost any Arduino will work for this project, providing it has enough pins. Make sure you read our Arduino buying guide if you are not sure what model you need. You may already have these parts in your Arduino starter kit.

Arduino Traffic Light: The Basics

Let’s start small. A basic, single traffic light is a good place to start. Here’s the circuit:

Circuit diagram for basic Arduino traffic light

Connect the anode (long leg) of each LED to digital pins eight, nine, and ten (via a 220-ohm resistor). Connect the cathodes (short leg) to the Arduino’s ground.

Code for the Arduino Traffic Light

Start by defining variables so that you can address the lights by name rather than a number. Start a new Arduino project, and begin with these lines:

int red = 10;
int yellow = 9;
int green = 8;

Next, let’s add the setup function, where you’ll configure the red, yellow and green LEDs to be outputs. Since you have created variables to represent the pin numbers, you can now refer to the pins by name instead:

void setup(){
    pinMode(red, OUTPUT);
    pinMode(yellow, OUTPUT);
    pinMode(green, OUTPUT);
}

The pinMode function configures the Arduino to use a given pin as an output. You have to do this for your LEDs to work at all. Now for the actual logic of the traffic light. Here’s the code you need. Add this below your variable definitions and setup function:

void loop(){
    changeLights();
    delay(15000);
}

void changeLights(){
    // green off, yellow on for 3 seconds
    digitalWrite(green, LOW);
    digitalWrite(yellow, HIGH);
    delay(3000);

    // turn off yellow, then turn red on for 5 seconds
    digitalWrite(yellow, LOW);
    digitalWrite(red, HIGH);
    delay(5000);

    // red and yellow on for 2 seconds (red is already on though)
    digitalWrite(yellow, HIGH);
    delay(2000);

    // turn off red and yellow, then turn on green
    digitalWrite(yellow, LOW);
    digitalWrite(red, LOW);
    digitalWrite(green, HIGH);
    delay(3000);
}

Upload this code to your Arduino, and run (make sure to select the correct board and port from the Tools > Board and Tools > Port menus). You should have a working traffic light that changes every 15 seconds, like this (sped up):

Arduino traffic light in action

Let’s break down this code. The changeLights function performs all the hard work. This rotates the traffic light through yellow and red, then back to green. As this gets called inside the loop function, the Arduino will run this code forever, with a 15-second pause every time.

The changeLights function consists of four distinct steps:

  • Green on, yellow off
  • Yellow off, red on
  • Yellow on, red on
  • Green on, red off, yellow off

These four steps replicate the process used in real traffic lights. For each step, the code is very similar. The appropriate LED gets turned on or off using digitalWrite. This is an Arduino function used to set output pins to HIGH (for on), or LOW (for off).

After enabling or disabling the required LEDs, the delay makes the Arduino wait for a given amount of time. Three seconds in this case.

Going Deeper: Arduino Pedestrian Crossing

Now that you know the basics, let’s improve it. Add in a pushbutton for pedestrians to change the light whenever they like:

Circuit diagram for Arduino pedestrian crossing

Notice how the traffic light is exactly the same as the previous example. Connect the button to digital pin 12. You’ll notice that the switch has a high-impedance 10k-ohm resistor attached to it, and you may be wondering why. This is a pull-down resistor.

A switch either lets the current flow or doesn’t. This seems simple enough, but in a logic circuit, the current should be always flowing in either a high or low state (remember, 1 or 0, HIGH or LOW). You might assume that a pushbutton switch that isn’t actually pressed would be in a LOW state, but in fact, it’s said to be ‘floating’, because no current gets drawn at all.

In this floating state, it’s possible that a false reading will occur as it fluctuates with electrical interference. In other words, a floating switch is giving neither a reliable HIGH nor LOW reading. A pull-down resistor keeps a small amount of current flowing when the switch gets closed, thereby ensuring an accurate low state reading.

In other logic circuits, you may find a pull-up resistor instead, and this works on the same principle, but in reverse, making sure that particular logic gate defaults to high.

Now, in the loop part of the code, instead of changing the lights every 15 seconds, you’re going to read the state of the pushbutton switch instead, and only change the lights when it’s activated.

Code for the Arduino Pedestrian Crossing

Start by adding a new variable to store your button pin:

int button = 12; // switch is on pin 12

Now, in the setup function, add a new line to declare the switch as an input. Add a line to set the traffic lights to the green stage. Without this initial setting, they would off until the first time changeLights runs.
pinMode(button, INPUT);
digitalWrite(green, HIGH);

Change the entire loop function to the following instead:

void loop() {
    if (digitalRead(button) == HIGH){
        delay(15); // software debounce
        if (digitalRead(button) == HIGH) {
            // if the switch is HIGH, ie. pushed down - change the lights!
            changeLights();
            delay(15000); // wait for 15 seconds
        }
    }
}

That should do it. You may be wondering why the button checking happens twice (digitalRead(button)), separated by a small delay. This is debouncing. Much like the pull-down resistor for the button, this simple check stops the code detecting minor interference as a button press.

By waiting inside the if statement for 15 seconds, the traffic lights can’t change for at least that duration. Once 15 seconds is over the loop restarts. Each restart of the loop, it reads the state of the button again, but if it isn’t pressed, the if statement never activates, the lights never change, and the program restarts again.

Here’s how this looks (sped up):

Arduino pedestrian crossing in action

Arduino Traffic Light with Junction

Let’s try a more advanced model. Instead of a pedestrian crossing, change your circuit to have two traffic lights:

Cricuit diagram for Arduino traffic lights with junction

Connect the second traffic light to digital pins 11, 12, and 13.
Code for the Arduino Traffic Light with Junction

First, assign your new traffic light pins to variables, and configure them as outputs, like in the first example:

// light one
int red1 = 10;
int yellow1 = 9;
int green1 = 8;

// light two
int red2 = 13;
int yellow2 = 12;
int green2 = 11;

void setup(){
    // light one
    pinMode(red1, OUTPUT);
    pinMode(yellow1, OUTPUT);
    pinMode(green1, OUTPUT);

    // light two
    pinMode(red2, OUTPUT);
    pinMode(yellow2, OUTPUT);
    pinMode(green2, OUTPUT);
}

Now, update your loop to use the code from the first example (instead of the pedestrian crossing):

void loop(){
    changeLights();
    delay(15000);
}

Once again, all the work is carried out in the changeLights function. Rather than going red > red & yellow > green, this code will alternate the traffic lights. When one is on green, the other is on red. Here’s the code:

void changeLights(){
    // turn both yellows on
    digitalWrite(green1, LOW);
    digitalWrite(yellow1, HIGH);
    digitalWrite(yellow2, HIGH);
    delay(5000);

    // turn both yellows off, and opposite green and red
    digitalWrite(yellow1, LOW);
    digitalWrite(red1, HIGH);
    digitalWrite(yellow2, LOW);
    digitalWrite(red2, LOW);
    digitalWrite(green2, HIGH);
    delay(5000);

    // both yellows on again
    digitalWrite(yellow1, HIGH);
    digitalWrite(yellow2, HIGH);
    digitalWrite(green2, LOW);
    delay(3000);

    // turn both yellows off, and opposite green and red
    digitalWrite(green1, HIGH);
    digitalWrite(yellow1, LOW);
    digitalWrite(red1, LOW);
    digitalWrite(yellow2, LOW);
    digitalWrite(red2, HIGH);
    delay(5000);
}

Here’s what that looks like (sped up):

Arduino traffic light with junction in action

Arduino Traffic Light Next Steps

That’s all for today. Your new understanding of Arduino LEDs and buttons applies to all kinds of different projects. If you want to expand these traffic lights, why not build a four-way (or more) junction, complete with many pedestrian crossings, and pedestrian traffic lights?

Or why not expand your new skills with a bigger project such as this DIY MIDI controller?

Image Credit: androsvector/Shutterstock

Read the full article: Arduino Programming for Beginners: Traffic Light Controller Project Tutorial